3. Python setup and environments
3.1. Python versions
The Python programming language comes in different versions. The most recent major version numbers are "Python 2" and "Python 3" (and smaller scale changes continue, within those versions). While some codes and commands will work equivalently in either Python 2 or 3, there are several central syntaxes and operations that have been changed between them, so they should essentially be considered separate.
Some differences cause errors if you try to run a code in a Python interpreter of the wrong version (which is good, because it alerts you to a problem), and some differences can just give you a different result without complaining (which is bad, because you don't know that the calculated value is different than what the program author intended). A pretty full list of differences between the versions are noted in the "What's New" documentation HERE. So, be sure to use the correct Python interpreter version for your given commands. Also, be sure to look at help files for the correct version.
In these notes we will utilize Python 3, because the older Python 2 (specifically, Python 2.7) has now been deprecated. That is, old Python 2 codes aren't considered inherently incorrect, but on new computers Python 3 will be the default, and developers won't help with any code questions/problems related to just Python 2. At times, we might point out specific differences between Python 2 and 3, but in general we will just focus on the latter.
In particular, for following these notes, you should have Python 3.6 or later installed. The "3" is the major version number, which is typically how we will refer to the version, and the "6" is the minor version number. There are also micro versions, like the "1" in 3.6.1, typically for small bug fixes and changes.
To check what version of Python you have installed on your computer from a Linux shell (a non-Python environment), type:
python -V
From within a Python environment, you can type:
import sys ; print(sys.version)
... and the first number displayed will be the version.
3.2. Python environments and interfaces
We will use Python primarily through one of the following interfaces or ways of starting a Python environment. Some of these are simpler or more helpful for certain tasks, or depending on whether you are using your own computer or one where you can't install things easily. There might be other useful Python interfaces out there, and feel free to use those, too.
The first three (IPython, scripts, and Jupyter Notebooks) run locally on a computer, so they do not need an internet connection to be used; however, each of these does require installing Python and other dependencies/modules to be used (which is typically not so bad). Colab requires an active internet connection during use, since it utilizes a server elsewhere, but you shouldn't need to install anything on your computer (so it could be run in a computer lab or internet cafe easily, where you don't have installation permissions). Possible interfaces (and there may be other useful ones, too) are:
in the IPython (
ipython) interactive environment in a computer terminal. Here, Python operations can be run directly, variables can be defined and remembered for the the duration of a session, and files can be run/executed;with scripts in text files that we write, save and run (= execute). This makes it easy to save algorithms and programs for later usage and work, to distribute or turn in for assignments, etc.;
in Jupyter Notebooks, which combine the interactive functionality of
ipythonwith the storage of scripts; the notebook interface opens up in the local browser (such as Firefox, for example) and also contains output images embedded in the page. Even though this opens up in a browser, no internet connection is needed to use these;with Google Colab, an interface that is basically a Jupyter Notebook that runs in a web browser. Colab notebooks can be saved to a GoogleDrive account. These are handy because they can run on basically any computer and operating system, and allow us to get underway with Python with no installation/downloads/setup---but the trade off is that this does require active internet connection during use. Most aspects of using a Jupyter Notebook will apply here.
Sometimes, these interfaces will be used together. For example, we
might run scripts in IPython, and then check variable values or
functions interactively. Having an interactive environment for running
commands is very useful for checking out the code as one constructs
it, as well as for investigating possible errors. ipython on its
own is convenient for quick tests and calculations, while scripts and
Jupyter/Colab are useful for storing larger, more complicated
algorithms and programs.
3.2.1. Text editor for scripts: gedit
For this course, we will use the gedit text editor, which is quite
basic but does at least have the nice feature of recognizing and
highlighting Python keywords (syntax highlighting). This is not
necessary, but it typically makes code easier to type and follow.
Syntax highlighting will typically appear when a file has been saved
with the .py extension, which the editor can recognize as
signifying a Python command file. But if you prefer using a different
text editor, by all means do so---hopefully one with some kind of
syntax highlighting.
To use the gedit editor, you can use shell terminal commands to
navigate to the directory in which you have a preexisting file, or in
which you want to create a new file. Then type the following in the
terminal (Linux shell, not Python environment):
gedit THE_FILE_NAME.py &
... which will open an editable text file such as this:
Entering commands in a script (text file) to run/execute |
|---|

|
If a file called "THE_FILE_NAME.py" already exists in that directory,
then gedit will open it; otherwise, it will create an empty file
of that name for you to start editing. Using the ampersand &
symbol will allow for other commands to be run in the terminal while
the editor is open (in technical terms, using & symbol makes the
gedit command run in the "background", allowing other commands to
still be executed in the "foreground").
It is important to make your file names meaningful, either for your own use and remembering, or for that of submitting it for a class, etc. Also, make sure that your file name ends in ".py", so that the text editor will recognize it as a Python-program file and make colors for Python keywords appropriately.
Additionally, make sure you go into gedit's Preferences and set
the following properties (and if you are using a different text
editor, it would be good to set it up similarly):
display line numbers, which helps with organizing, pinpointing runtime errors that Python points out, and interacting with others;
replace tabs with spaces, which makes code more portable, as different text editors or computers can have different tab settings;
set the tabulation width to 4 spaces. Having a larger tab size makes the code harder to read easily, esp. as programs get more complicated; having a smaller one makes it hard to differentiate commonly used features like nested loops and conditions).
These panels show how to set values in the gedit preferences (and
if using a different editor, establish similar settings):
gedit-> Preferences

Text files (= scripts) are very convenient for programming. You can save your commands to be run later or on different computers. You can (and will!) add comments to your code to describe what sections do. For larger projects, you may find it useful to spread your code out amongst several text files and have them work together. Just note that the variable values and outputs such as plots are not saved in this way (unless you create them and store them explicitly in separate files); this is one feature that Jupyter notebooks have, allowing output images to be stored directly in the files.
3.2.2. Terminal environment for commands: ipython
IPython is so named because it is an Interactive Python
environment. To use ipython, it is probably best to navigate to
your working directory of files in the Linux shell terminal. This
makes it easier to save some work later in an organized fashion, and
it is also easier to execute the scripts. Then type the
following in the terminal:
ipython
... and you should now be in the interactive environment in the
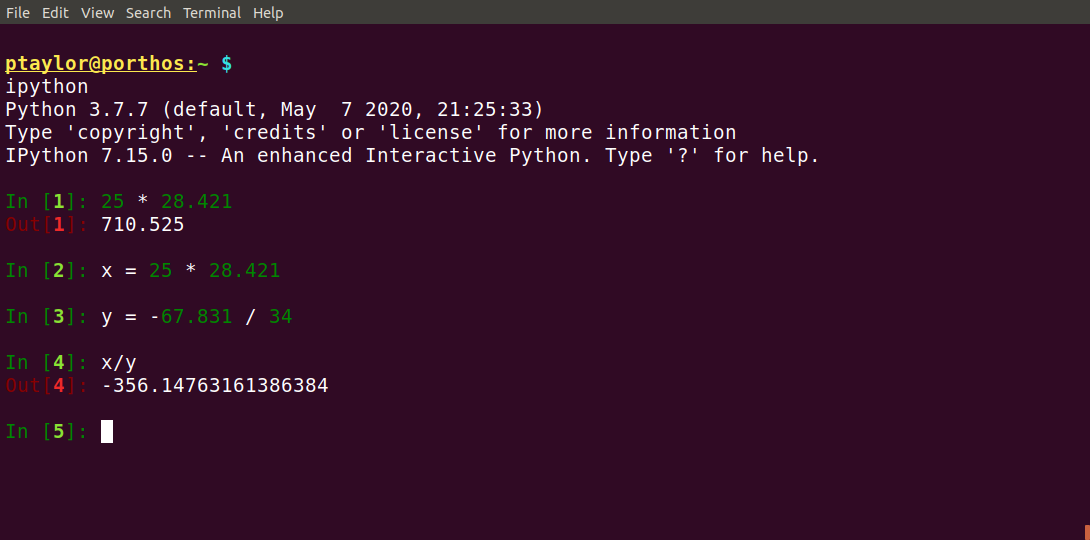
terminal itself. Voila. The following image shows an example of what
the Python environment in the terminal might look like---the colors
may differ on your system, but the prompt for each command should be
similar: In [1]: etc. (For whatever reason, the Ipython prompt
does not look like classical Python one >>>, which was discussed
here.)
Running interactive IPython environment in terminal window |
|---|
|
The ipython interface has several convenient features:
syntax highlighting: Python keywords (
for,if, etc.) are recognized and shown in different colors, making flow structures clear;executed commands are remembered within (and even between) sessions: you can use the "up" arrow to scroll backwards through the history of entered commands to recall or reuse a command. Note that calculated values are stored within (but not between) IPython sessions;
TAB autocompletion: if typing a known function, variable or keyword name, you can start typing it out and then hit the
TABkey at any point, and the interpreter will complete as much as it can uniquely, as well as prompt you for possible options. This often makes typing much faster;
and more. This is a very convenient interface for quick calculations, for testing commands and for reading help. However, since quantities are not saved from session to session, it becomes inconvenient to enter a large set of related commands that you will want to use again later. For that, and for most larger projects, scripts or Jupyter notebooks are more convenient. Though, again, we might run scripts from within IPython, as well.
To exit the ipython environment, enter exit as a command in
the prompt. You can also hit two keys CTRL + d, and then verify
that you want to exit, if asked.
We note that one can also just type python in a Linux terminal to
start a regular Python environment instead of the ipython one.
This plain Python environment does use >>> as its prompt. And while
the plain python environment does allow you to scroll through
previous commands, it lacks several of the other nice features of
IPython highlighted above, with no real benefits. So, probably just
ignore that option.
3.2.3. Browser interface (run locally): Jupyter Notebook
A Jupyter Notebook combines features of a script and a terminal, with some tweaks of behavior, too. Like a script, you can put series of commands to execute, but these can be grouped into "cells" that are executed one-by-one. This can be convenient for testing small parts of code as you work. Like a terminal it has tab-autocompletion, and the output is displayed within the same interface when a bit of code is executed; however, the output in the Notebook can also be a plot (rather than opening in a new window or saving to a file), which can be convenient for sharing with others. These Notebooks are often useful for small and medium-sized projects and/or classwork.
To use Jupyter Notebook, again it is probably best to navigate to your working directory of files in the Linux shell terminal, for easier opening and saving of work. Then, type into your terminal:
jupyter-notebook
and your browser should open up with a Jupyter menu page. You can click on an existing notebook if one existed in that directory, or you can click the "New" button in the upper right to start a new notebook (select "Python 3" for the environment version, if presented a choice). The new or existing notebook should open, into which you can type commands:
Using a Jupyter notebook to run and store Python commands

The notebook contains prompts in the browser page that are similar to
the ipython ones. However, each prompt can be more of a cluster
of commands that are entered line-by-line and then run as a modular
section, called a cell. Jupyter Notebook cells also have the
TAB autocompletion (described above) capability.
To move to a newline within a cell, you can hit the ENTER key,
just as you would in a text editor. In order to evaluate all
commands in a cell, hit the two keys SHIFT+ENTER when the cursor
is inside the desired cell, and it should run. Being able to group
sets of commands in cells can be convenient for testing small parts of
code as you work.
To evaluate all the cells in a notebook in order (top -> down), there
is a "Run" key at the top of the page, below the menu list. This is
useful, for example, if you make a change in one cell that might
affect the contents of others, so that they can all be reevaluated.
One trickiness of cells is making sure that you properly re-run all
cells that are "downstream" of any change you make. Also, at present
some very convenient Linux behavior such as pasting text with the
middle mouse button is not available (for some unknown reason); so one
has to use CTRL+c and CTRL+v to copy and paste.
In summary, a Jupyter Notebook combines features of a script and a terminal, with some tweaks of behavior, too. These notebooks are often useful for small and medium-sized projects and/or classwork.
The notebook to be opened can be specified a name at the top of the page (default is "Untitled"), and saved and used again later. To directly open an existing jupyter-notebook from the terminal, one can type:
jupyter-notebook THE_FILE_NAME.ipynb
Note the standard extension for notebooks: "ipynb". Remember to save your work as you go.
To exit the Jupyter Notebook environment, in the terminal one can hit
the two keys CTRL + c. When asked to verify shutting down the
notebook server, type y and hit ENTER.
3.2.4. Browser interface (run online): Google Colab
As noted above, this is basically a Jupyter Notebook that lives entirely online. Therefore, you don't need to install/setup anything on your computer to run it, other than to have a modern browser (such as Firefox, Chrome, Chromium, Safari, Explorer, etc.) and an active internet connection. If convenient, you can even jump back and forth between using Jupyter Notebooks (offline) and Colab (online).
Using Google Colab (notebook) to run and store Python code online

Separately, you can upload existing Jupyter Notebooks into Colab from the top row of Menu items (select: File -> Upload), and/or download the Colab Notebook to your computer (select: File -> Download .ipynb). After downloading the notebook, you can treat it as a standard Jupyter Notebook, which might be useful if you want to carry on working offline.
The Colab Notebook is organized similar to a Jupyter Notebook, above,
using cells that can each contain as many lines of commands that
you wish. As well, hitting ENTER in a cell brings you to a new
line to keep typing, and the SHIFT+ENTER combination executes the
current cell.